
In this post i will show you how to configure IPsec tunnel between Sonicwall and Mikrotik.
I assume you have some knowledge of RouterOS so lets first do the configuration on Mikrotik first.
MIKROTIK
These are addresses on Mikrotik interfaces. 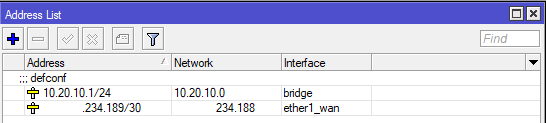
Lets head over to the tab IP -> IPsec -> Peer Profiles and configure the profile in which we will specify the encryption/hashing method which will be used to setup Phase 1 secure tunnel in which two peers will negotiate.
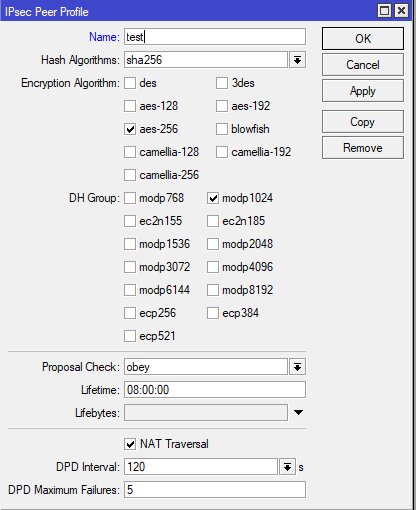
Choose the encryption/hashing method along with Diffie Helman group (DH) which best suits your needs and your environment.
NAT traversal allows systems behind NATs to request and establish secure connections on demand,and in order to have ESP packets traverse NAT.
(DPD) Dead Peer Detection is a method of detecting a dead Internet Key Exchange (IKE) peer. For example there can be situations where two peers loose connectivity to each other but they can’t identify the loss of connectivity because the Security Associations (SA) which were formed during the PHASE1 negotiation remain in the UP state until their lifetime timer expires. What happens in this case is the traffic is then routed through the tunnel which actually doesn’t exist.
After this lets go to the Peers tab and configure our peer which in this case would be Sonicwall.
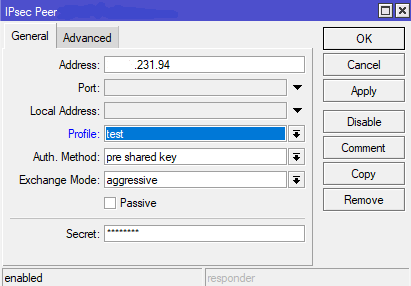
We specify the ip address of our remote peer, along with the Profile we just created in the step before. In our example we are using Authentication Method with pre shared key. For Exchange Mode and compatibility with Sonicwall i’ve had most success with Agressive mode, for whatever reason sometimes my tunnels would not establish using Main mode.
To sucessfuly and securely communicate using IPsec, the IKE is using Main mode or Aggressive mode (Phase 1) which authenticates and/or encrypts the peers. And Quick Mode (Phase 2) which negotiates and agrees on which traffic will be sent across the VPN.
Difference between Agressive and Main mode is that Aggressive sends fewer messages (packet exchanges)(3) while Main mode requires 6 messages during Phase 1 negotiation. Also Agressive mode does not provide Peer Identity Protection, meaning the peers exchange their identity without encryption, unless certificates are used.
So to conclude, Agressive Mode is not as secure as Main Mode, but it is faster. Also it is mostly used when one of the peers have dynamic external ip address.
Next, on the Advanced under the Peers we set our ID to user fqdn, with this ID we will present ourselves to the peer. You can type any value here. The reason i use user fqdn is the same reason im using Agressive mode. I’ve had problems with establishing connections while using different ID types. Also set the “send initial contact” if you’re using dynamic ip address at this location, and you are initiating a connection to a sonicwall which has static public ip address.

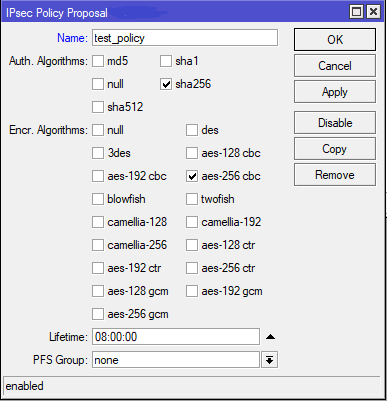
After this we will go to the Policy Proposals tab. Here we will configure encryption/hashing policy that the peers will use for Phase 2 negotiation. Phase 1 negotiates a security association (SA) between two IKE peers, which enables the peers to communicate securely in Phase 2 and form IPSec SA’s. Both sides must have the same matching values.
Now we come to the point where we need to specify what traffic we want to send through the IPSec tunnel. Go to the Policies tab and add the Source Address (traffic from your site which you want tunneled) , and the Destination Address (traffic at the remote site with which you want to communicate) in our case network.
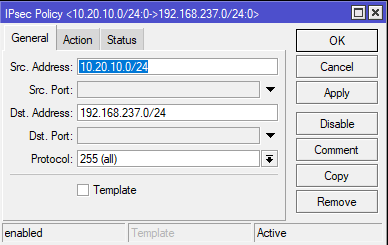
On the Action tab window, for Action: specify encrypt, meaning the traffic from your network to remote network will be encrypted. Set Level: to unique for the situations when you are having multiple subnets crossing the tunnel. If you leave it at Level: require, only the first policy will match and be pushed through the tunnel. For IPsec Protocols: use esp, and use the Tunnel mode which encrypts whole IP packet. For SA Source Address if you’re behind dynamic public ip address, use 0.0.0.0. For SA Destination Address, use the peer public ip address. In here you also insert the Policy Proposal which you created earlier.

Theres two more important parts which we need to configure before our tunnels are established. First one is to create firewall rules to allow and open ports for IPsec functions and traffic. UDP 500 for key setup if you use IKE. NAT-T UDP Encapsulation is using UDP 4500. You should also enable IPsec-ESP Protocol 50 which are the packets transporting the actual payload.
Altough there are some situations where you don’t need to specifically allow ESP-50 depending on your firewall rule setup. For example when you have the rule in chain input with filter accept for packets belonging to established or related connections, and since you’ve might allow both peers to initiate the connection rather than passively respond incoming connections, both send packets to each other from the same UDP ports on which they listen (500), and then at Mikrotik side, the initial packet from the Sonicwall is treated as if it belonged to the connection initiated by the Mikrotik itself.

Second one is to create NAT rules or should i say NO-NAT rules for the traffic/packets that should be sent to remote networks. Normally when we are leaving our LAN, and going to the outside locations, our traffic is NAT-ed (Masquerade). But in this case we dont want to NAT our packets which are going to the remote networks, because if they are NAT-ed then the IPsec policies would not match.

End result should show that our tunnels are established after we configure Sonicwall.

SONICWALL
Now lets head over to the Sonicwall. Here assume you’ve got some static Public ip address configured which we specified before as our Peer Address on Mikrotik.
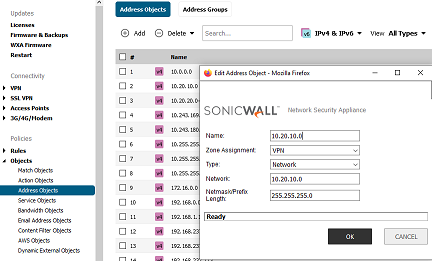
First lets create Address Object for the Destination Network which we want to reach, in our case its the Mikrotik’s LAN (10.20.10.0/24).
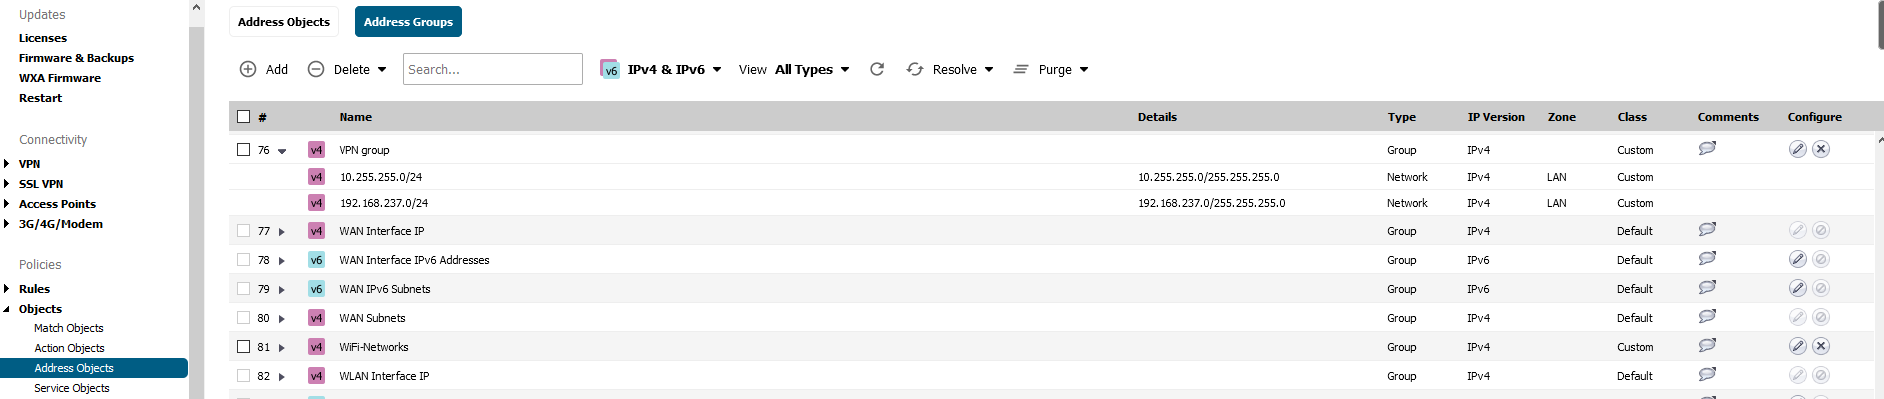
Then we also create Address Object for our Local Networks and Group them under our VPN group object which we want reachable from the Mikrotik (the ones configured on Mikrotik IPsec policies).
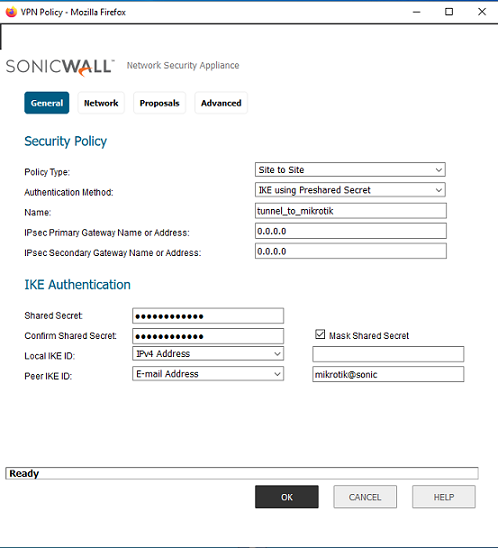
After this we go to VPN tab and under Base Settings click add to create new VPN tunnel. Choose Site-to-Site using preshared key. Insert the name you want, and in this case since Mikrotik doesnt have public static ip address, we will use 0.0.0.0 , meaning we accept any connections with valid key and proposals.
Next you specify the shared secret and IDs. Under Peer ID choose e-mail and insert the same ID we’ve configured on Mikrotik (fqdn).
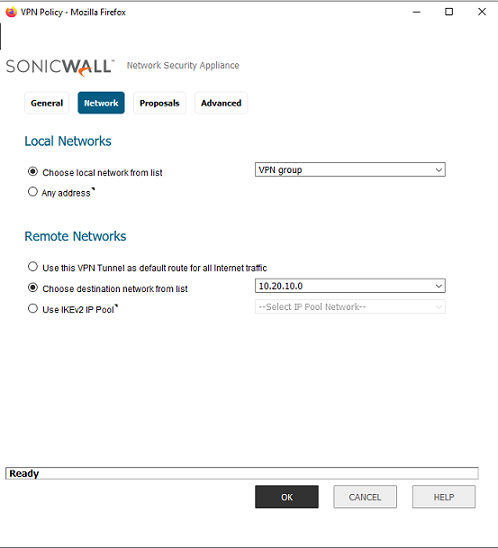
On the Network tab, choose your Local Network which you want to be accessible from remote locations. Before we created VPN group object. And for Remote Networks choose the Mikrotik’s LAN.
Under the Proposals tab, settings must be same on both sides for both Phases which we explained before. So choose Aggressive Mode, DH Group: 2 which is equivalent to mikrotics 1024bit group. Next is encryption and hashing, we used aes-256 and sha256 with protocol ESP. Lifetime stays the default which is 8 hours.
After that our tunnels should be up, you should see green circle under the VPN in sonicwall.

Hope you enjoyed reading this and that it helped you, thanks!