
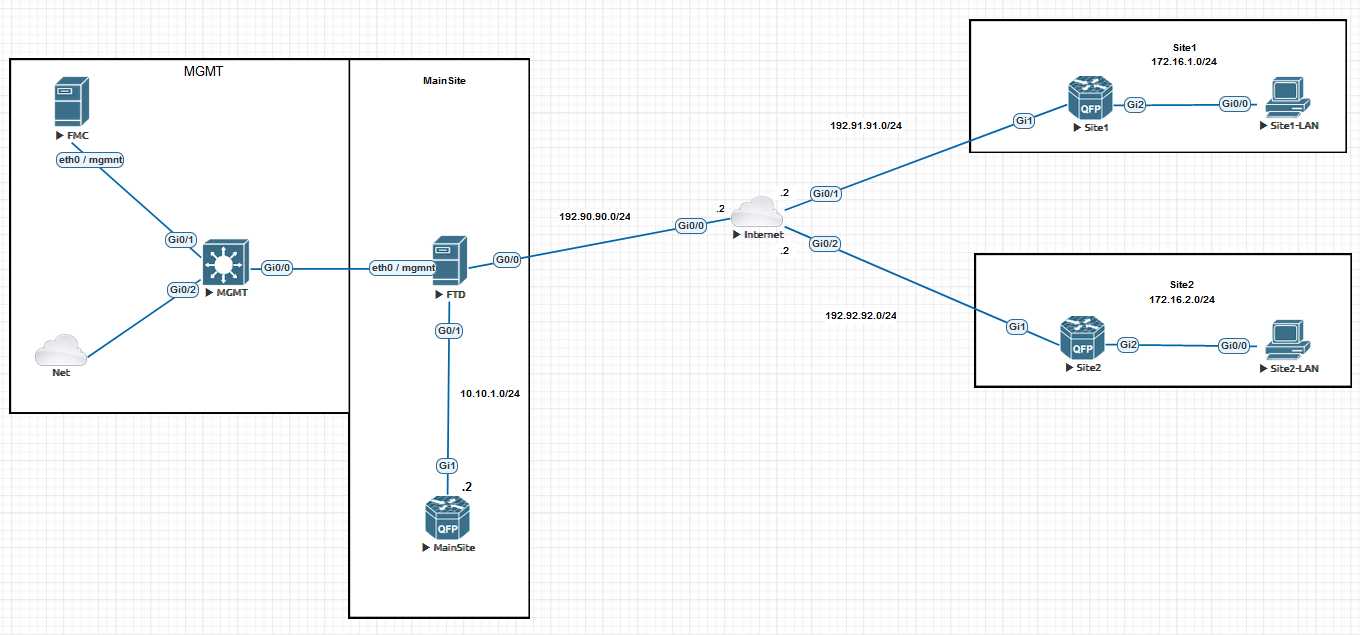
Here we will see how to configure simple Site-to-Site Hub and Spoke IPsec tunnel between Cisco Firepower Threat Defense NGFW and a Router at remote sites. I configure the FTD by using FMC in separate MGMT network.
Difference between IKEv1 and IKEv2
Let’s first clear out some differences between IKEv1 and IKEv2 and mention a few of them.
IKEv2 is a little better and advanced version. While IKEv1 had exchange modes (Main,Aggressive), Aggressive basically reduced the number of messages needed to be sent to establish the VPN (6 messages) while the Main mode was 8 messages. IKEv2 uses only 4 messages in total.
IKEv1 used symmetric authentication, meaning both sides had to use same authentication method.
In IKEv2 you can use different authentication methods.
IKEv1 used lifetimes for SA (security associations) and had to be agreed between peers. IKEv2 doesn’t care anybody can delete SA when they want by exchanging DELETE payload.
In IKEv2 NAT-T and DPD is supported by default, while in IKEv1 it was an extension that you had to define.
IKEv1 is not reliable like IKEv2 because in IKEv2 all messages are defined as Request/Respond pairs and communication is much more defined along with the procedure to delete SA and procedure to retransmit messages.
FTD Configuration:
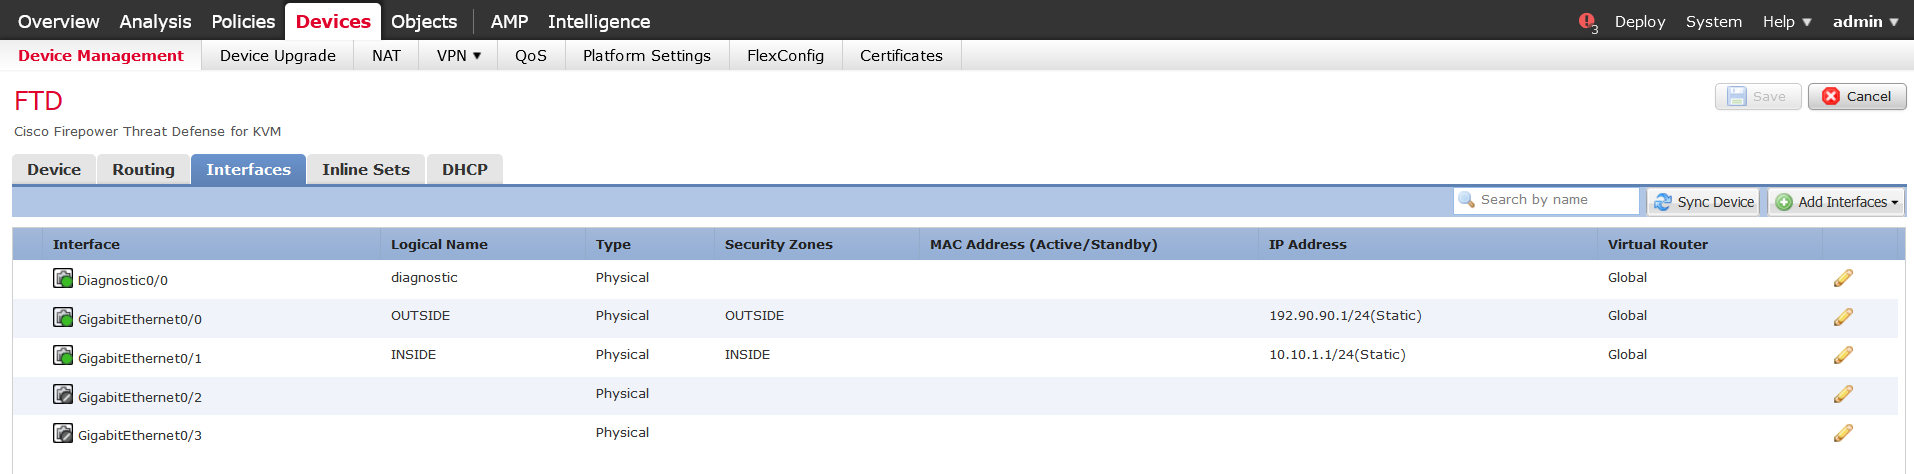
Interfaces are configured:
After that we’re moving onto the VPN configuration by going to VPN->Site to Site tab.
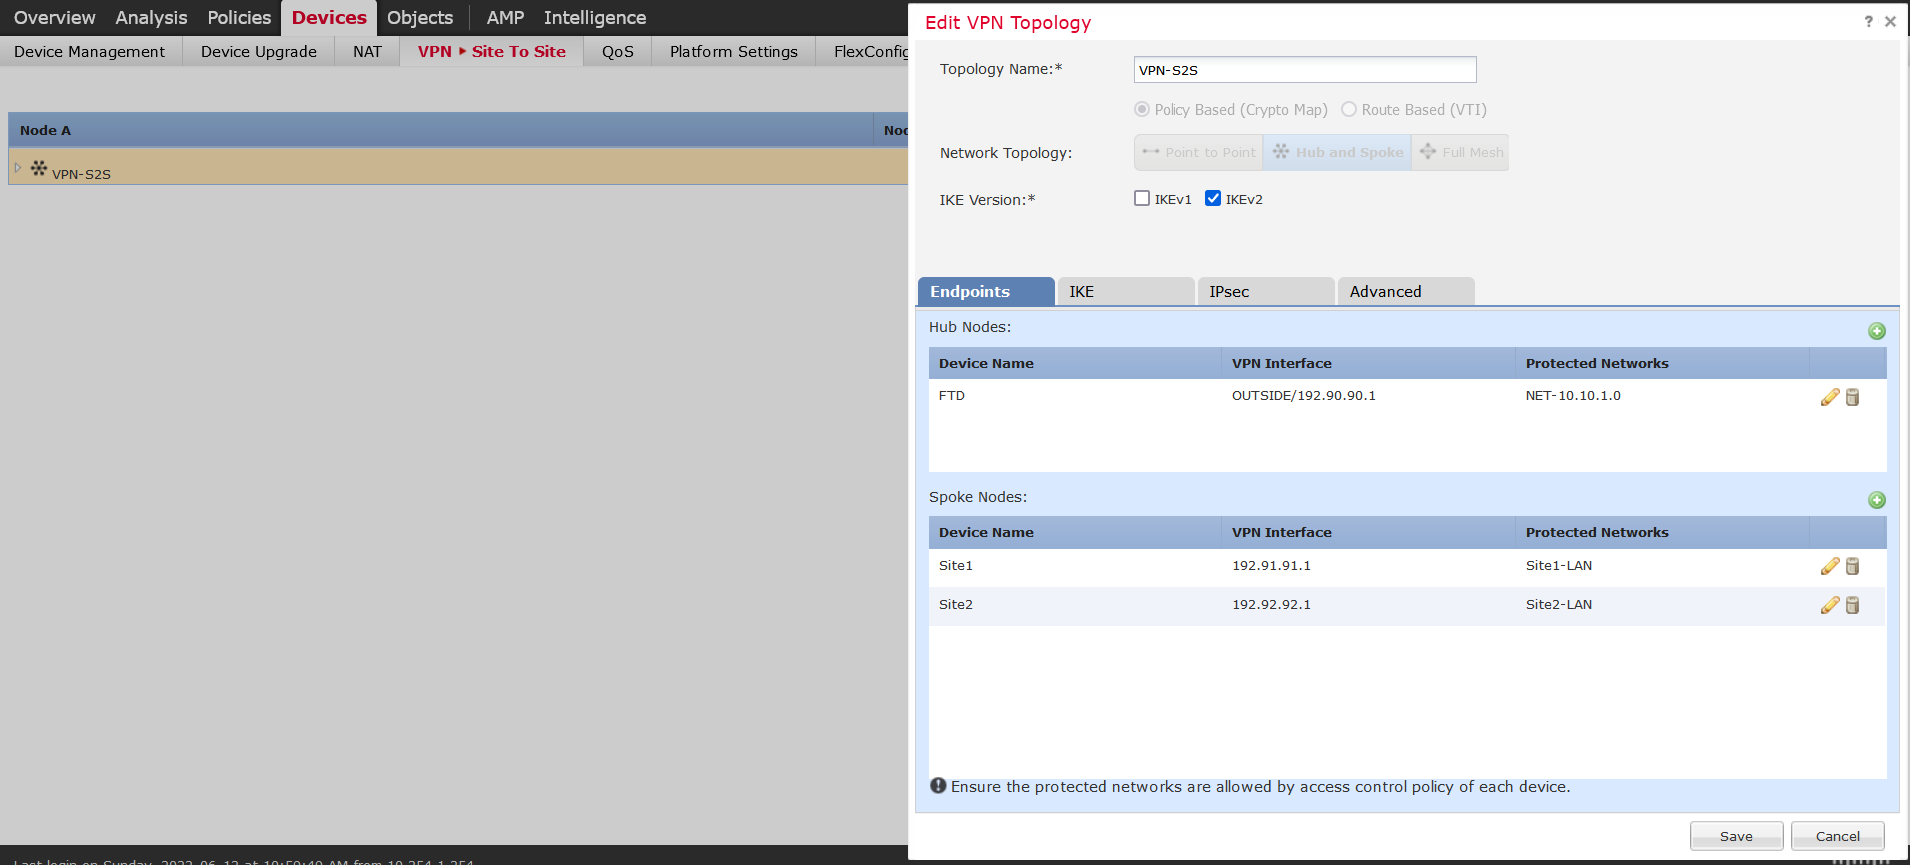
Here you go to Add VPN and choose the topology for the VPN and IKE version. In this example we’re using Hub and Spoke with IKEv2. Add the HUB node with your OUTSIDE facing interface along with the Protected networks that you want to encrypt and send across the tunnel. You can use ACL for this also, I’ve created an object and used that.
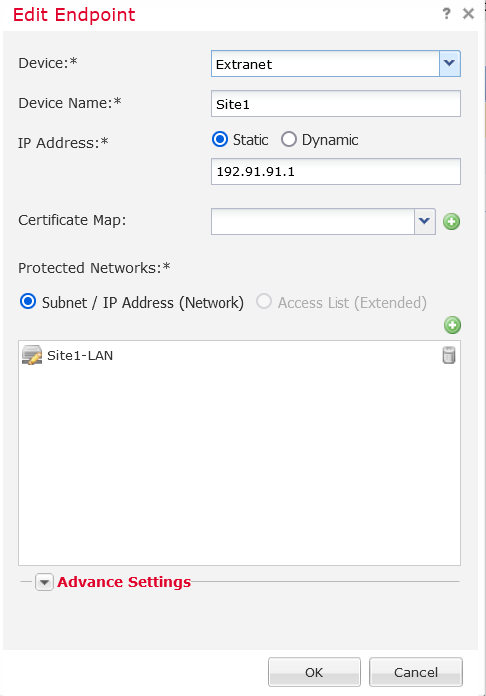
After finishing the HUB nodes, add the SPOKE nodes along with the remote networks that will traverse the tunnel. When choosing devices that are not FTD and are not managed by your FMC, you have to choose external device like it shows in the endpoint example for Site1.
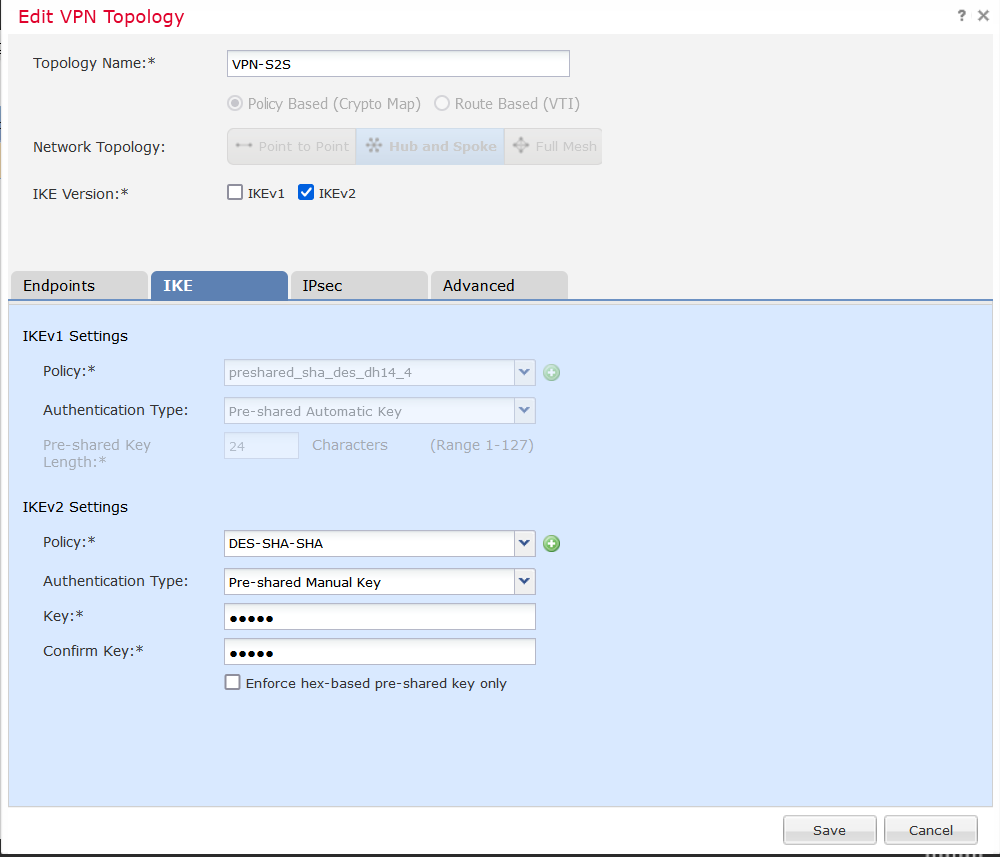
After you’re done with the Endpoints tab, move to the IKE tab and configure you’re encryption,hash, DH group along with PRF for IKEv2 policy. I’ve used DES and SHA1 because this FTD version is evaluation and it doesn’t allow strong encryption.
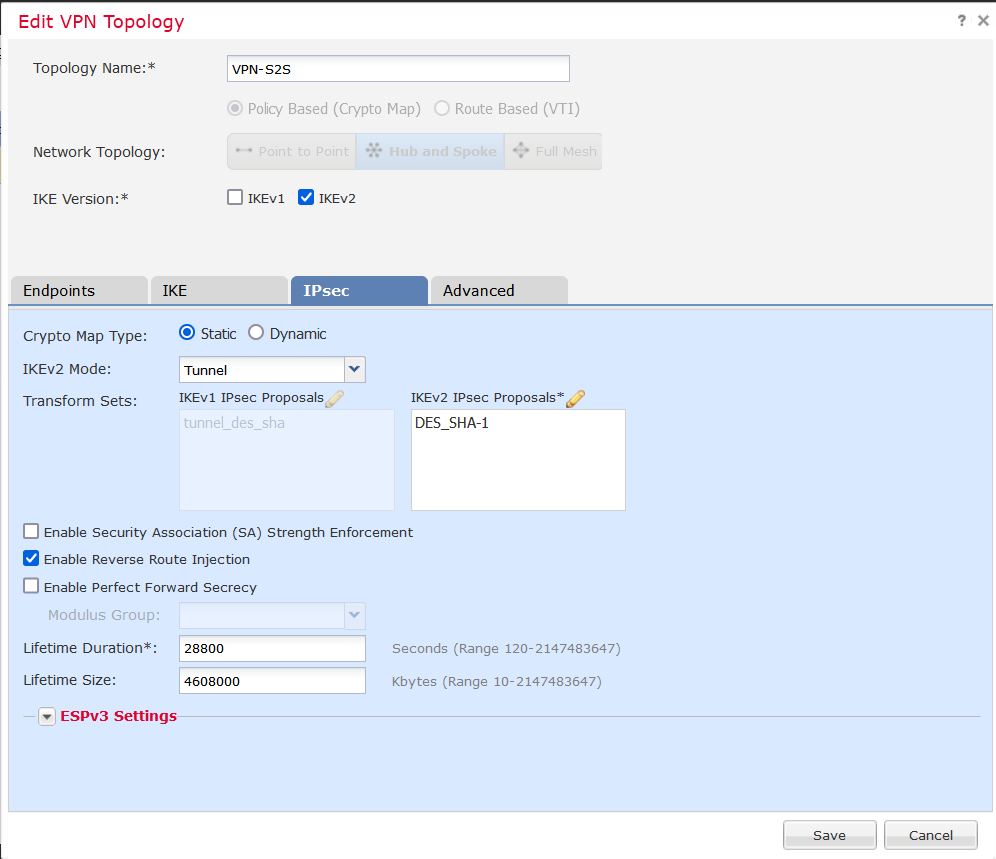
Next is the IPSEC tab where you also define the policy parameters where it is also chosen DES and SHA1. The rest is left at the default values.
And we’re done with the VPN configuration. One thing you must not forget is how your traffic flow through the FTD and if you have any NAT/ACP rules. We have to allow traffic through the FTD for particular tunnel traffic. So adding the rules in ACP as follows:
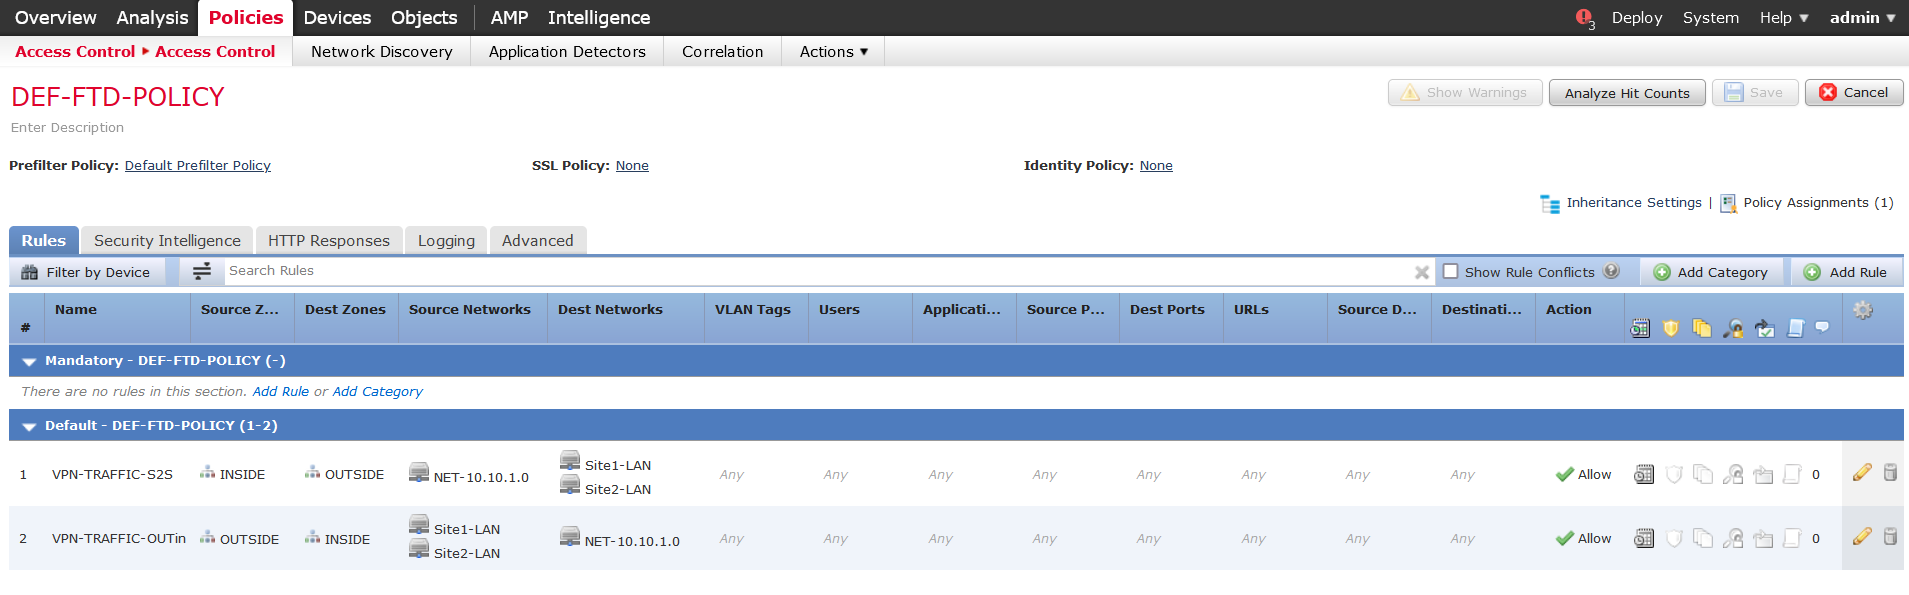
Im not using any NAT in this example. Don’t forget to deploy the configuration.
Router Configuration
1
2
3
4
5
6
7
8
9
10
11
12
13
14
15
16
17
18
19
20
21
22
23
24
25
26
27
28
Site1(config)#crypto ikev2 proposal IKEV2PROPOSAL
Site1(config-ikev2-proposal)#encryption des
Site1(config-ikev2-proposal)# integrity sha1
Site1(config-ikev2-proposal)# group 14
Site1(config-ikev2-proposal)#prf sha1
---------------------------------------------------------------------------
Site1(config)#crypto ikev2 policy IKEV2POLICY
Site1(config-ikev2-policy)# proposal IKEV2PROPOSAL
------------------------------------------------------------------------------
Site1(config)#crypto ikev2 profile IKEV2PROFILE
Site1(config-ikev2-profile)# match identity remote address 192.90.90.1 255.255.255.255
Site1(config-ikev2-profile)# identity local address 192.91.91.1
Site1(config-ikev2-profile)# authentication local pre-share key cisco
Site1(config-ikev2-profile)# authentication remote pre-share key cisco
----------------------------------------------------------------------------------
Site1(config)#crypto ipsec transform-set TSET esp-des esp-sha-hmac
-----------------------------------------------------------------------------------
Site1(config)#ip access-list extended VPN
Site1(config-ext-nacl)#permit ip 172.16.1.0 0.0.0.255 10.10.1.0 0.0.0.255
-----------------------------------------------------------------------------------
Site1(config)#crypto map CRYMAP 10 ipsec-isakmp
Site1(config-crypto-map)# set peer 192.90.90.1
Site1(config-crypto-map)# set transform-set TSET
Site1(config-crypto-map)# set ikev2-profile IKEV2PROFILE
Site1(config-crypto-map)# match address VPN
-----------------------------------------------------------------------------------
Site1(config)#interface GigabitEthernet1
Site1(config-if)# crypto map CRYMAP
Now we initiate traffic from LAN host in 172.16.1.0/24 network:
1
2
3
SITE1-LAN#ping 10.10.1.2
Sending 5, 100-byte ICMP Echos to 10.10.1.2, timeout is 2 seconds:
.!!!!
IKEv2 SA verification
1
2
3
4
5
6
7
8
9
Site1#show crypto ikev2 sa
 IPv4 Crypto IKEv2  SA

Tunnel-id Local                 Remote                fvrf/ivrf            Status
1         192.91.91.1/500       192.90.90.1/500       none/none            READY
      Encr: DES, PRF: SHA1, Hash: SHA96, DH Grp:14, Auth sign: PSK, Auth verify: PSK
      Life/Active Time: 86400/4 sec

 IPv6 Crypto IKEv2  SA
Thanks for reading!